- Hover over Posts in the left hand column and select Add New. Note: If the left sidebar is not showing, click the top right three vertical dots and make sure the first three VIEW items are deselected. WordPress defaults to Fullscreen mode. Make sure Fullscreen mode is deselected.

- Give the page a title – you can copy the title from a Word doc but occasionally the font size will appear to be off. If the font size appears to be off it should be fine on the front end.
- If the post will have a subheading (only for blog posts) click the + icon or click your enter/return key. Choose Browse All from the block options and select Blog Subheading. Type the subheading in the new input.

- Write or paste the text into the blog post after cursor is on a new line. You don’t have to paste content paragraph by paragraph. Just start a new line and paste from your clipboard. WordPress is now pretty good at bringing in links and formatting from posts that you might have written in MS Word. Images won’t import so at each spot where you want an on-page image you’ll need to place it, or circle back and insert them after the text content is placed.
- If you paste content from another website (always a copyright risk) it will often bring in the images from the page, but those images will not be on your web server. You must upload images to the web server or risk them being missing at a later date.
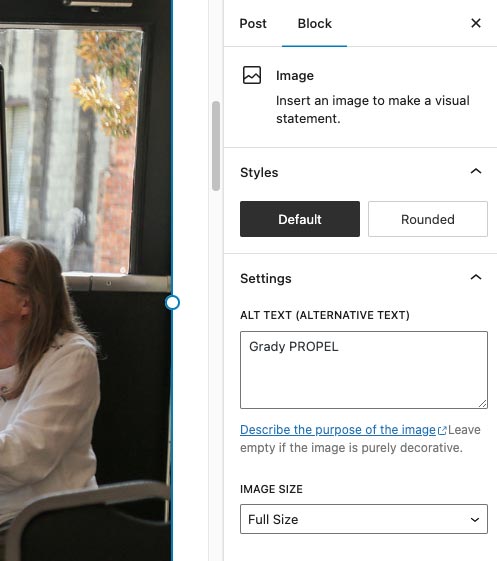
- Add images to content. Grab on-page images that were saved in the same size as the featured image. They can also be saved in a taller height, but the width should be the same as shown above for best results. If the on-page image will have a caption you’ll enter it below the image after you’ve placed it. Be sure to give these images an Alt tag as well. You’ll do this in the right column after selecting the image for the page. Image size should default to full size but if you see problems on the front end check this setting as well.
- Adding bulleted lists, ordered lists, pull quotes and headings is different than it was before WordPress switched to the Gutenberg editor. Type a front slash (/) to get a menu to choose the block type or click the plus (+) icon to the right of the new content line. You’ll get more choices from the right + but test to see the results.

- You can adjust the content type for the blog after you create it as well but there are fewer choices.
- You can add a column structure to the page by choosing the Columns block. Choose from the given options for splitting the page. Getting the right results on desktop AND mobile can be tricky. The first time you work with the column tool you might want to schedule a quick walk through by phone so you’ll understand the options and how to test the results. After adding the column structure you’ll add content blocks to the columns.

- You can add a separator line to a page or column by choosing this as a block type.
- You can add a spacer to a page or column by choosing this as a block type. Set the height of the spacer in the right column/ In general a large spacer between sections will be around 90 pixels tall.
- Add a button to a page and create the button text and the link. If the link is for an off site resource choose to “Open the link in a new tab” option.
- At bottom of post area:
- Add the Home Banner Image if this story will appear on the home page banner slider. Give the image Alt Text but no caption is necessary. The headline on the image is the story Title. Note that the Category “Home Page Slider” must be chosen for thsi option to appear.
- Manually Add Contact. For articles that need a contact, click Show the Contact Field Inputs and then enter the contact details.
- Manually Add Writer Click Show the Writer Field inputs if the Writer is not a User on the website. Otherwise the Writer will be added in the right side editing covered below.

- On right side of blog post
- At the very top of the right side you’ll see a choice for Post or Block. Make sure you’re in Post mode.
- Set the article date if it’s not for today. For instance if the article publish date should have been yesterday then you can set the date in the past. If you want to schedule the article for later posting then set a future date.
- Set the author. This will already be your name if you’re the writer. There’s a “PSO Staff” author name for general attribute if no Writer is needed.
- Choose a Category from choices shown. Do not manually add a category here. These are not tags and new Categories should require approval. There can be multiple Categories and this is the spot to choose placement on the Home Page Slider and Featured Stories for the main News page. Adjust as necessary, save and check on the front end. Choose the Primary Category. The Primary category will show up as the first category on the front-end.
- Choose a tag or tags. This was overused previously so guidelines will be set here in the future (12/26/23).
- Featured Image – blog posts and photo stories only. Click to choose the featured image you saved at the start of the blog post process. Choose Upload File unless it’s already in the media library. Once the image uploads you’ll see some inputs on the right. Give it an Alt Text entry that’s very simple for users with accessibility issues. This is required for ADA compliance so do it on all images*. Enter the Caption on the right along with the photo credit, for example (Photos: Shannah Montgomery/PSO) . The caption will show when the user hovers over the featured image area.

- Manually Adjust URL – web page address On the right side column click the URL and you’ll be able to edit it. In general the assigned URL should be fine.

- To change the preview of the story that will appear in Google, Facebook, etc, go to the Yoast SEO box under the post. Don’t adjust the slug – this is the page URL. You can edit the SEO Title by removing the default items in that input field and typing something new. For blog posts the SEO title default is usually good to leave as is. You can add a meta description if you want, but the default is usually okay. The image that’s displayed should be the Featured Image.

- Quick Edit
- On the main list of All Posts there’s a Quick Edit function that allows you to change the Author, Category, Date, and Tags. This is a convenient place to make these updates after the story is Published.
- There’s a way to Bulk Edit multiple posts as well, but definitely use with caution.
